Excel VSTO Add-in: Add Ribbon Button and Update Cell Value
Written by Igor Katenov, Lead Developer of 10Tec Products
Published:
Our previous article related to VSTO provides a basic sample demonstrating how to display a form every time when Excel starts. This is not much useful in the real life. Let's do something more practical now. We customize the Excel interface by adding a Ribbon button to display a dialog in which the user can make a choice and update cell value accordingly:

The dialog will display a list of countries with cultures inside them to select the first day of week in a particular culture. As earlier, we will build an Excel VSTO add-in with VB.NET and Visual Studio.
Step 1: Add a button to the Office Ribbon
Let's begin. Launch Visual Studio and create a new solution based on the "Excel VSTO Add-in" template. If you cannot find this template in the list of available templates, most likely, your copy of Visual Studio is not configured for Office development with VSTO. In this case, we refer you to the previous article: you will find preliminary instructions for configuring Visual Studio for development with VSTO in it.
Enter any suitable name of the new solution in the "Configure your new project" dialog and hit the Create button:

A new Excel VSTO Add-in solution appears. Our main goal is adding a clickable button to the Office Ribbon. You can add custom items to the Ribbon using a designer like the traditional Windows Forms designer, do this from code or customize the Ribbon in advanced ways with XML. All these techniques are described in the Microsoft documentation – a good starting point is the Ribbon Overview topic in the Office UI Customization section. We will create a Ribbon button the simplest way, i.e. visually with the Ribbon Designer.
Select the "Add New Item…" command from the Project menu of Visual Studio or from the context menu of our Excel VSTO Add-in project. In the "Add New Item" dialog, select the "Ribbon (Visual Designer)" item and click the Add button:

The Ribbon Designer opens, displaying the default Add-ins tab and one Ribbon group inside it. To add a button to the Ribbon, drag the Button control from the "Office Ribbon Controls" group in the Visual Studio Toolbox to the only group named Group1:

Hit F5 to test our VSTO add-in. Excel opens, and we should see the created Button1 on the Add-ins tab in the Office Ribbon when we switch to this tab:

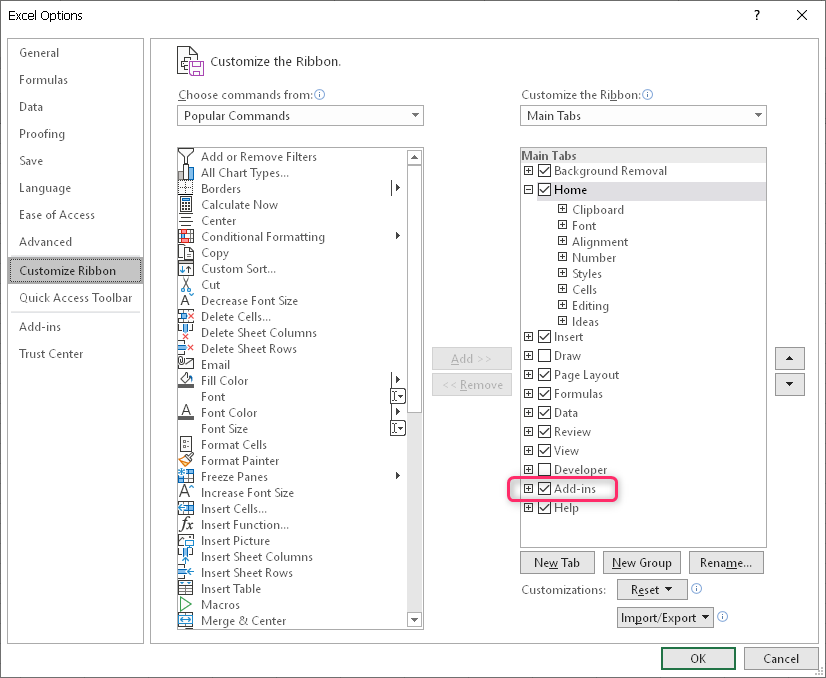
If you do not see the Add-ins tab, it may be hidden by default. To enable it, open the "Customize Ribbon" tab in the Excel options dialog and tick the Add-ins item in the list of available Ribbon tabs:
Well, the first task is done – we have just added a button to the Ribbon. If you want, you can change the button caption to something more understandable like "Select Country". Select the added Button1 control and change its Text property in the Visual Studio property grid accordingly.
Step 2: Create a dialog with country list
We already have a Ribbon button, and we want to show a dialog when the user clicks it. Now is the right time to create a Windows Forms form that will be used as the dialog and populate it. We will use our WinForms grid control named iGrid.NET to show the country list to select from.
First we add a new empty form to our Excel VSTO add-in solution by choosing the "Add Form (Windows Forms)…" command from the Project menu or from the project’s context menu in the Solution Explorer. Then drag the iGrid icon from the Visual Studio Toolbox to the form to create an instance of the iGrid control that will display a country list. Position the grid control on the form and change the form title to have something like this:

The grid will be populated with countries and cultures available inside every country in the form's Load event handler. Double-click the form's title to create a stub for the Form1_Load method. First add some Imports directives for the used types at the top of the module – they will help us to make our code a little bit cleaner:
Imports System.Globalization
Imports System.Windows.Forms
Imports TenTec.Windows.iGridLib
Now make the form's Load event handler looking like the following code snippet:
Private Sub Form1_Load(sender As Object, e As EventArgs) Handles MyBase.Load
    IGrid1.Cols.Add("Country")
    IGrid1.Cols.Add("Culture")
    IGrid1.Cols.Add("First Day of Week")

    Dim ci As CultureInfo
    For Each ci In CultureInfo.GetCultures(CultureTypes.SpecificCultures)
        Dim row As iGRow = IGrid1.Rows.Add()
        Dim ri As RegionInfo = New RegionInfo(ci.LCID)
        row.Cells(0).Value = ri.EnglishName
        row.Cells(1).Value = ci.EnglishName
        row.Cells(2).Value = ci.DateTimeFormat.FirstDayOfWeek.ToString()
    Next ci

    IGrid1.Cols.AutoWidth()
    IGrid1.RowMode = True
    IGrid1.ReadOnly = True
    IGrid1.FocusRect = False
    IGrid1.GridLines.Mode = iGGridLinesMode.Vertical
    IGrid1.SortObject.Add(0)
    IGrid1.Sort()
    IGrid1.SearchAsType.SearchCol = IGrid1.Cols(0)
    IGrid1.SearchAsType.Mode = iGSearchAsTypeMode.Seek
    IGrid1.SetCurCell(0, 0)
End Sub
We create 3 columns in iGrid, populate it with data, and set some visual and behavior settings. Our grid will look like a multi-column list box with vertical grid lines between columns; it will be sorted by the Country column, and the user will be able to find the required country by typing its first characters like on the screenshot at the top of this article.
Step 3: Show the dialog and update cell value
The dialog with country list should appear on the screen when the user clicks the "Select Country" button on the Ribbon. Let's write the corresponding event handler for this Ribbon button. Switch to the "Ribbon1.vb [Design]" tab in the Visual Studio workspace and double-click the Ribbon button we added earlier. A stub for the button's Click event handler appears in the code module of the Ribbon. Create an instance of the Form1 class and call its ShowDialog() method in this event handler:
Private Sub Button1_Click(sender As Object, e As RibbonControlEventArgs) Handles Button1.Click
    Dim myForm As New Form1
    myForm.ShowDialog()
End Sub
If you are eager to see the result of our work, hit F5 in Visual Studio to launch the new version of our Excel VSTO add-in. After Excel popped up, open the Add-ins tab in the Ribbon and click the "Select Country" button in it. The dialog populated with the data we expect to see must appear:

The only remaining part of work is updating of the value of the active cell when the user hits ENTER on the selected item. This work will be done in the KeyDown event handler of iGrid. Return to the form's code module (Form1.vb) and put the following event handler in it:
Private Sub IGrid1_KeyDown(sender As Object, e As KeyEventArgs) Handles IGrid1.KeyDown
    If e.KeyCode = Keys.Enter Then
        If IGrid1.CurCell IsNot Nothing Then
            Dim activeCell As Excel.Range = Globals.ThisAddIn.Application.ActiveCell
            activeCell.Value = IGrid1.Cells(IGrid1.CurCell.RowIndex, 1).Value
            Me.Close()
        End If
    End If
End Sub
That's all. You can hit F5 again, select a country in the list and click ENTER to make sure that the First Day of Week value from the selected item is placed into the active worksheet cell.
Wrapping up
An Excel VSTO add-in solution built in this article shows how to add a Ribbon button and display a dialog to update the value of the active worksheet cell. We were developing this add-in with Visual Studio that automatically registers our add-in in Excel. This means our add-in will load and become available in every copy of Excel. If you do not need this, don't forget to clean your solution with the Build\Clean Solution command in Visual Studio. This command also unregisters the add-in if you work with VSTO add-in solutions.
The source code of the developed add-in is available for downloading below. Pay attention to the fact that our solution includes the 10Tec iGrid.NET WinForms control, and you need to install it on your pc to have the ability to recompile the solution and work with it at design time in Visual Studio. You can find out more about iGrid.NET and find the links to the demo installation on this website.